STEP 1
Print and assemble the pattern
Follow the instructions for your paper size below.
36” x 48” size paper
1. Open the 36” print file in Adobe Acrobat
If you don’t already have Adobe Acrobat, download it here.
2. Open the layers panel
Our files are set up with each size on a separate layer which allows printing one size at a time. This saves on ink and removes overlapping lines which cause confusion.
3. Uncheck all the sizes except the size you want to print
4. Open the print panel
5. Print
Under the Page sizing & handling section, ensure ‘Actual size’ is selected
6. Measure the square
If incorrect, adjust the print settings until the square measures correct.
A0 size paper
1. Open the A0 print file in Adobe Acrobat
If you don’t already have Adobe Acrobat, download it here.
2. Open the layers panel
Our files are set up with each size on a separate layer which allows printing one size at a time. This saves on ink and removes overlapping lines which cause confusion.
3. Uncheck all the sizes except the size you want to print
4. Open the print panel
5. Print page 1 only
Under the Pages to Print section, select ‘Pages’ and type “1”
Under the Page sizing & handling section, ensure ‘Actual size’ is selected
6. Measure the square
If incorrect, adjust the print settings until the square measures correct.
7. Print the remaining pages
Under the Pages to Print section, select ‘Pages’ and type 2 - [total pages]
8. Lay the pages out as required
Row 1 = A1, A2, A3…
Row 2 = B1, B2, B3…
Row 3 = C1, C2, C3…
9. Cut out the rectangles on each page
10. Arrange and tape the rectangles together
For accurate alignment, match the diamonds along the edges
8” x 11.5” size paper
1. Open the 8.5” x 11” print file in Adobe Acrobat
If you don’t already have Adobe Acrobat, download it here.
2. Open the layers panel
Our files are set up with each size on a separate layer which allows printing one size at a time. This saves on ink and removes overlapping lines which cause confusion.
3. Uncheck all the sizes except the size you want to print
4. Open the print panel
5. Print page 1 only
Under the Pages to Print section, select ‘Pages’ and type “1”
Under the Page sizing & handling section, ensure ‘Actual size’ is selected
6. Measure the square
If incorrect, adjust the print settings until the square measures correct.
7. Print the remaining pages
Under the Pages to Print section, select ‘Pages’ and type 2 - [total pages]
8. Lay the pages out as required
Row 1 = A1, A2, A3…
Row 2 = B1, B2, B3…
Row 3 = C1, C2, C3…
9. Cut out the rectangles on each page
10. Arrange and tape the rectangles together
For accurate alignment, match the diamonds along the edges
A4 size paper
1. Open the A4 print file in Adobe Acrobat
If you don’t already have Adobe Acrobat, download it here.
2. Open the layers panel
Our files are set up with each size on a separate layer which allows printing one size at a time. This saves on ink and removes overlapping lines which cause confusion.
3. Uncheck all the sizes except the size you want to print
4. Open the print panel
5. Print page 1 only
Under the Pages to Print section, select ‘Pages’ and type 1
Under the Page sizing & handling section, ensure ‘Actual size’ is selected
6. Measure the square
If incorrect, adjust the print settings until the square measures correct.
7. Print the remaining pages
Under the Pages to Print section, select ‘Pages’ and type 2 - [total pages]
8. Lay the pages out as required
Row 1 = A1, A2, A3…
Row 2 = B1, B2, B3…
Row 3 = C1, C2, C3…
9. Cut out the rectangles on each page
10. Arrange and tape the rectangles together
For accurate alignment, match the diamonds along the edges
STEP 2
Round up your tools
Sewing machine
Iron and ironing board
Scissors
Tape
Pins
Fabric pen or chalk
STEP 3
Gather your materials
STEP 4
Cut out the paper pieces for your size
STEP 5
Cut out the fabric pieces
Seam allowance and hem allowance are already included.
Follow the cut instructions on the paper pieces Learn more >
STEP 6
Label your fabric pieces
For clarity, we made the wrong side of our fabric darker.
For a closer look, you can click or double-tap on the images to activate zoom.
STEP 8
Turn the belt loops right side out
Trim the excess allowance
STEP 9
Close the belt loops
Use 1/4 inch seam allowance
We chose a straight stitch
STEP 10
Attach the belt loops
Refer to the pattern for exact position
We chose a straight stitch
STEP 11
Sew the inseams
Use 1/2 inch seam allowance
We chose a plain seam with a straight stitch and finished it with an overcast stitch
STEP 12
Sew the rise seams
Use 1/2 inch seam allowance
We chose a plain seam with a straight stitch and finished it with an overcast stitch
STEP 13
Sew the outseams
Use 1/2 inch seam allowance
We chose a plain seam with a straight stitch and finished it with an overcast stitch
STEP 14
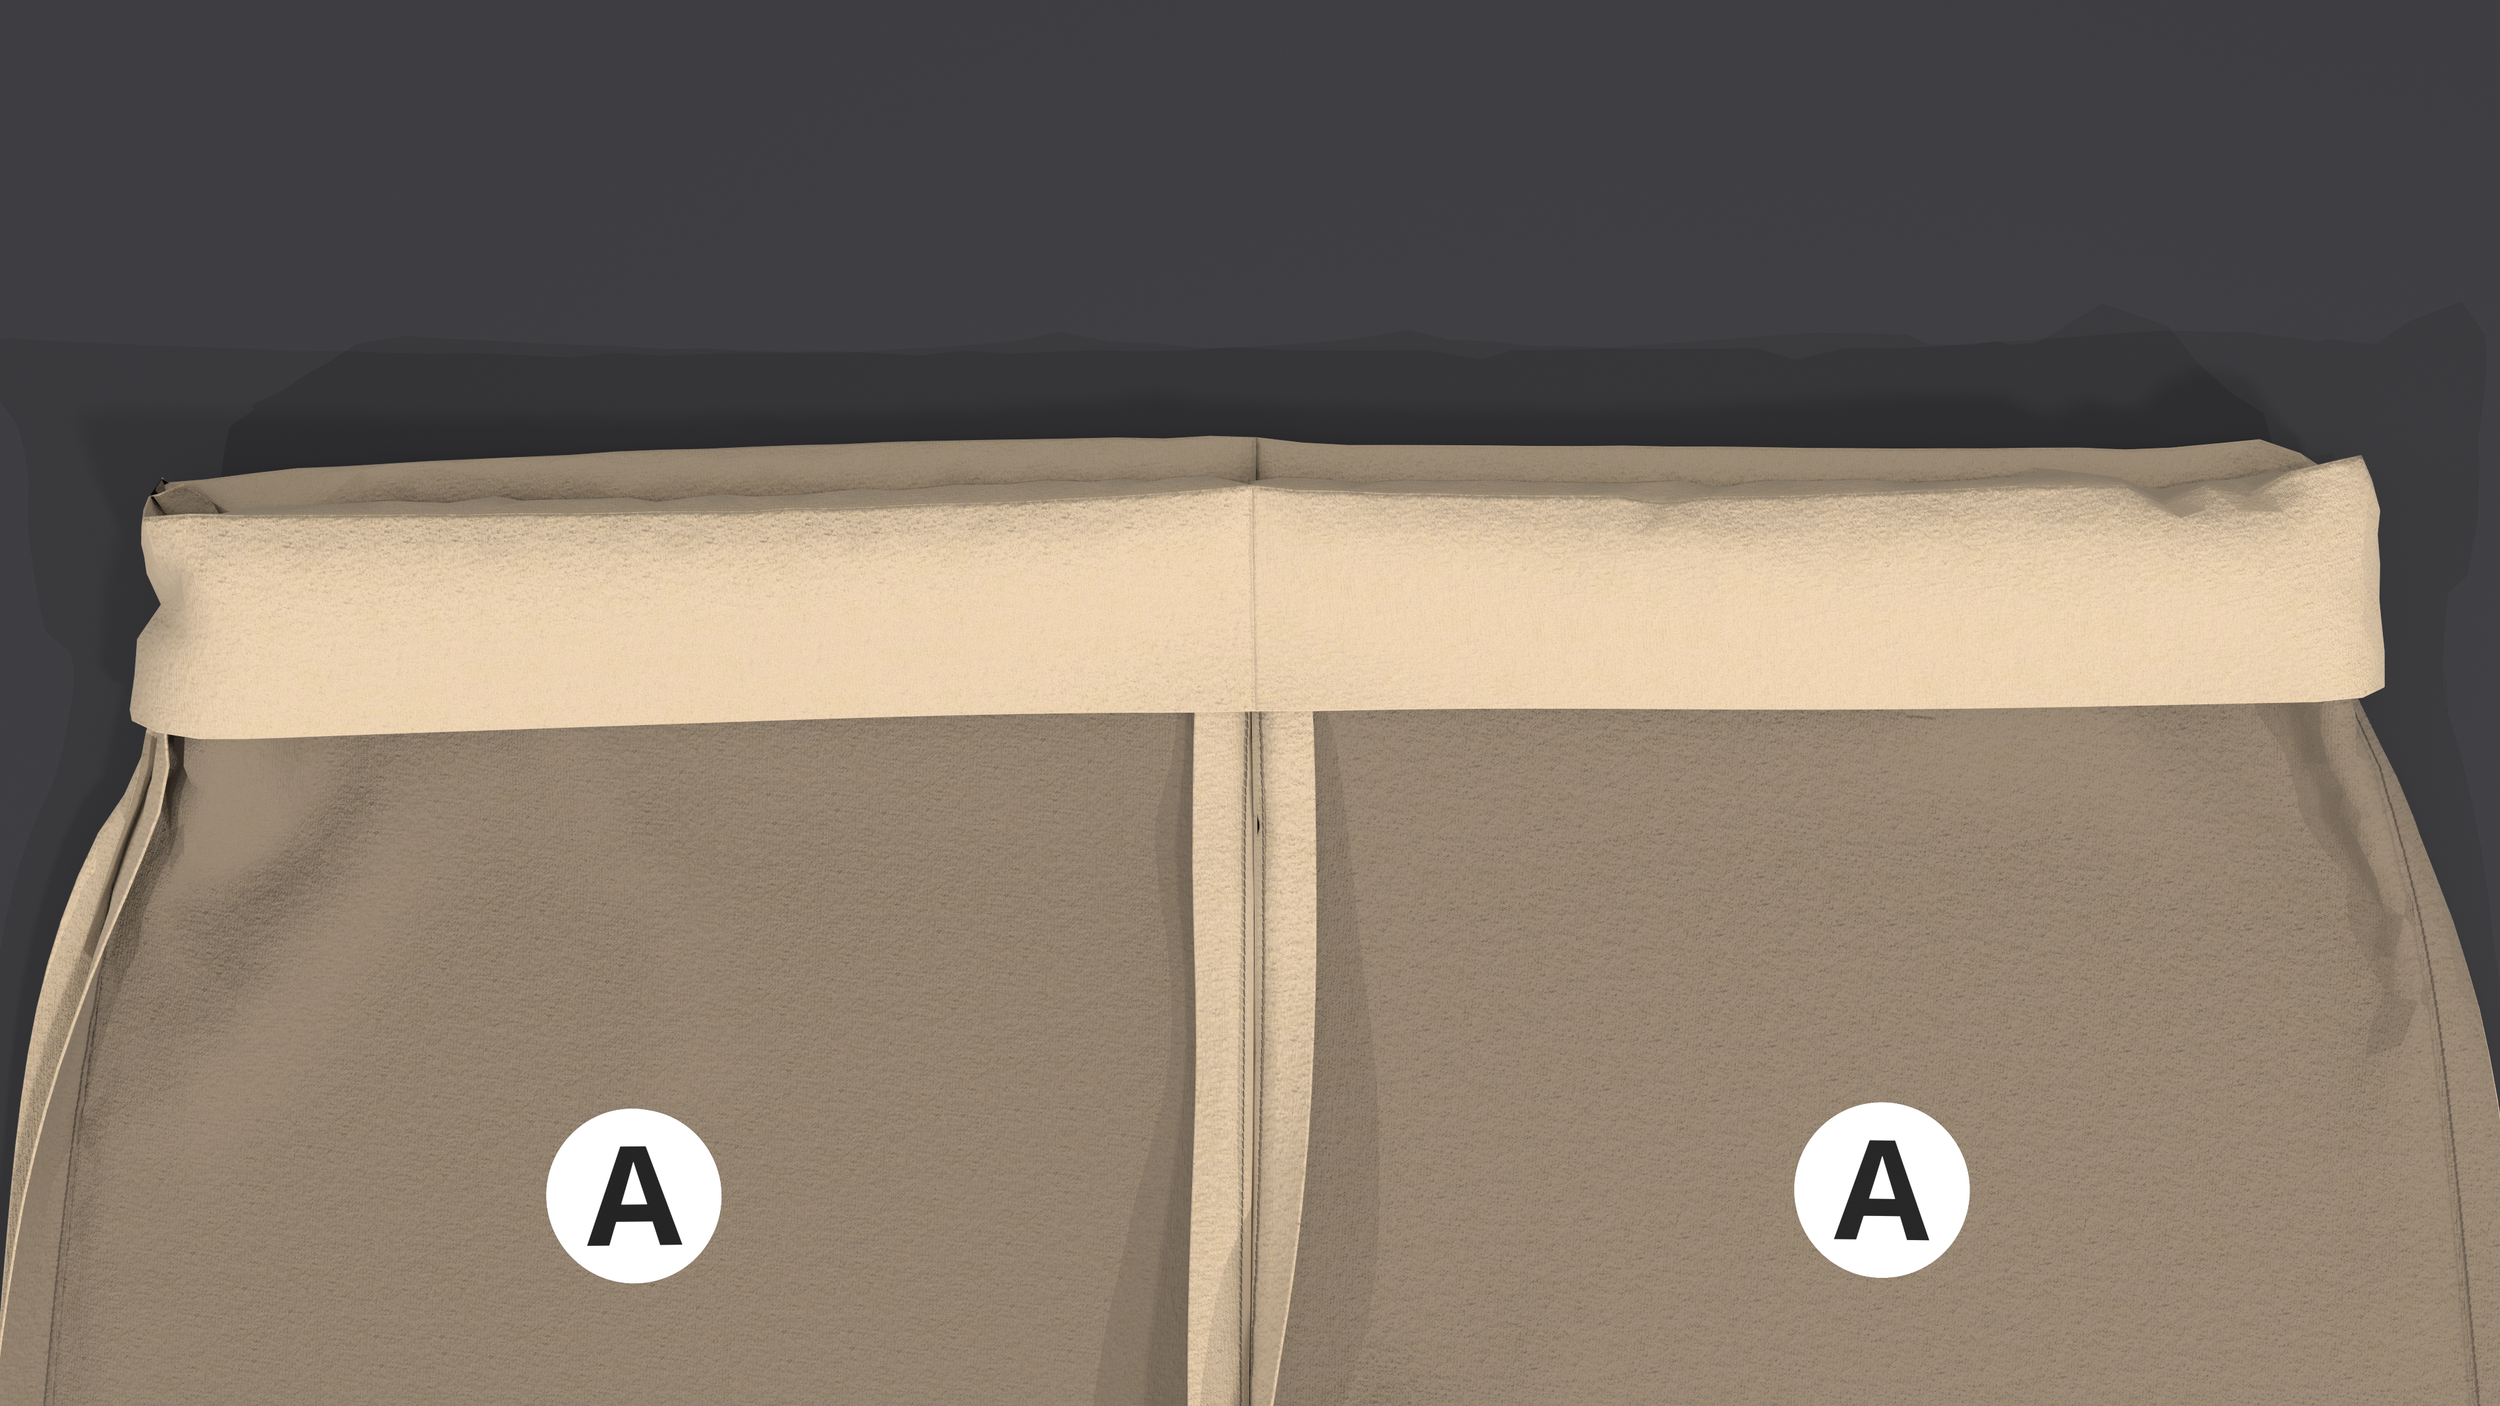
Fold the waistband
Measure 2.5" from the top edge
STEP 15
Fold the allowance
There is 1/2 inch fold allowance
STEP 16
Sew the elastic casing
Two straight stitches with 1/2 inch distance
Leave an opening for elastic insertion
STEP 17
Insert the elastic
STEP 18
Sew the cuffs
Use 1/2 inch seam allowance
We chose a straight stitch
STEP 19
Fold the center
STEP 20
Attach the cuffs
Use 1/2 inch seam allowance
We chose a plain seam with a straight stitch and finished it with an overcast stitch
STEP 21
Sew the waist tie
Use 1/2 inch seam allowance
We chose a straight stitch
STEP 22
Turn the waist tie right side out
STEP 23
Close the waist tie
COMPLETE
You did it!
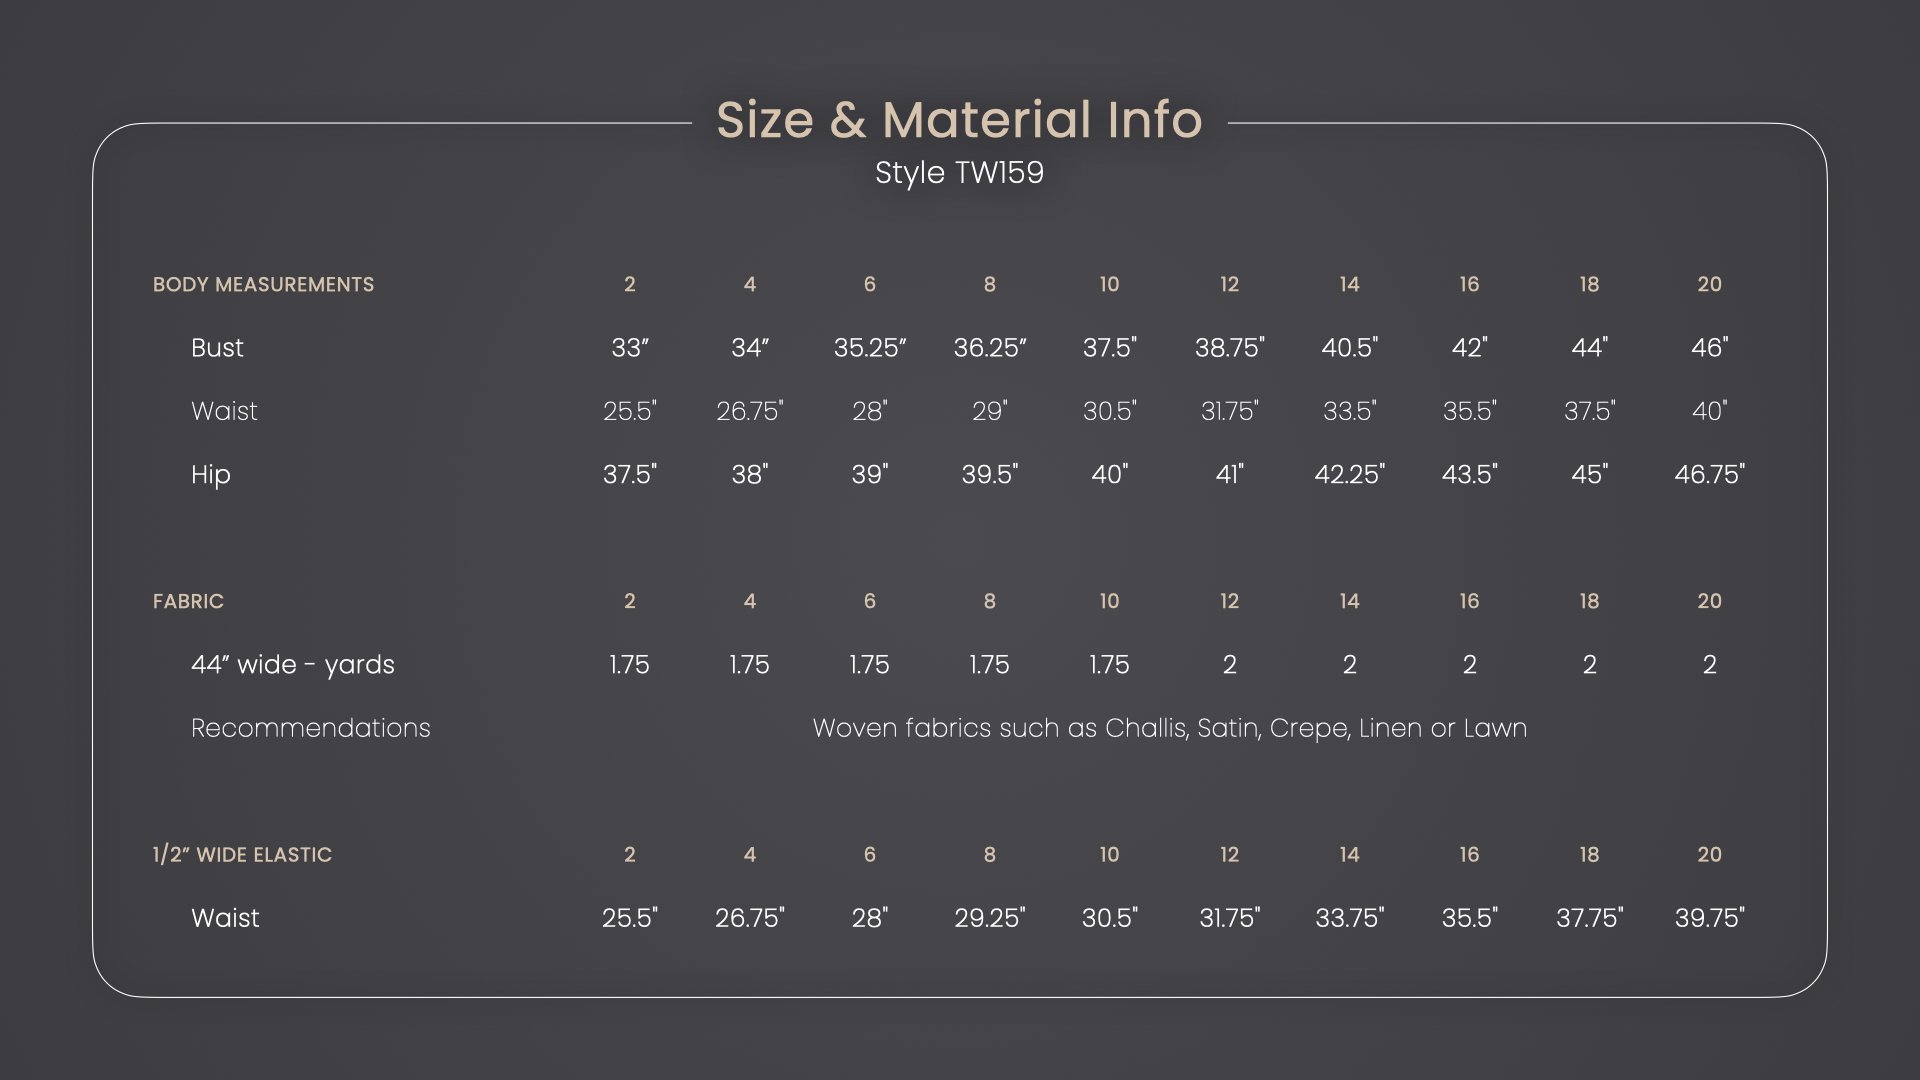
Be a pro! Trim any excess thread and allowances, then, give it a good iron.


